Control a robotic arm with Micro:bit and Smartphone

A robotic arm is a mechanical arm that can be programmed to move and perform tasks in a specific way. Robotic arms are used in a variety of industries, including manufacturing, construction, and medicine, as well as for research and development.
Robotic arms typically consist of a series of joints and links that allow the arm to move and bend, as well as motors or actuators that control the movement of the joints. Some robotic arms also have grippers or other end effectors that allow them to pick up and manipulate objects. The movement and actions of a robotic arm are controlled by a computer or microcontroller, which can be programmed to carry out specific tasks or can be operated manually using a remote control or other input device.
Depending on the application, robotic arms can vary in size and complexity, from small, lightweight arms used in laboratory research to large, heavy-duty arms used in industrial manufacturing. They can also have different degrees of freedom, which are the number of independent ways the arm can move. Some robotic arms have only a few degrees of freedom, while others can move in many different directions and can perform a wide range of tasks.
The Micro:bit is a small, low-cost computer that can be programmed using a variety of languages and can be used to control external devices. It has a number of built-in features such as a display, sensors, and buttons, and can also be connected to other devices and the internet using Bluetooth or a USB connection.
It is possible to use the Micro:bit to control a robotic arm by connecting the device to the robotic arm’s motors or actuators via its General Purpose Input Output (GPIO) pins. The Micro:bit can then be programmed to send signals to the robotic arm, controlling its movement and actions.
There are different ways to control a robotic arm with a Micro:bit. One way is to use the Micro:bit‘s built-in buttons or sensors to control the movement of the robotic arm. For example, a button press could trigger the robotic arm to move a certain way, or a sensor could be used to detect the position of an object and the robotic arm could be programmed to move to that position. Alternatively, the Micro:bit can be connected to a computer and controlled using a graphical programming interface, allowing more complex control over the robotic arm.
It’s worth mentioning that, while it’s possible to control a robotic arm with a Micro:bit, as it is a small and low-cost computer it is not the best option for all types of robotic arms and applications, it depends on the complexity and the power required for the robotic arm movements.
Purpose of project
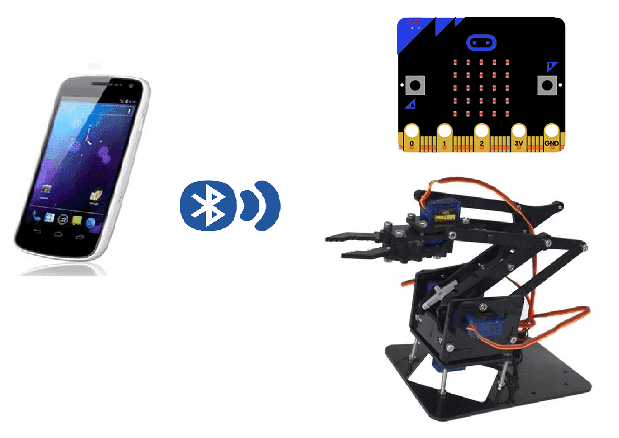
It is possible to control a robotic arm using a Micro:bit and a smartphone via Bluetooth. The Micro:bit can be programmed to act as a Bluetooth controller, sending signals to the robotic arm based on commands received from a smartphone.
The first step would be to connect the Micro:bit to the robotic arm using its General Purpose Input Output (GPIO) pins and program it to control the arm’s motors or actuators. Then, the Micro:bit needs to be configured to act as a Bluetooth controller, it can be done by programming it to listen for specific commands and sending them to the robotic arm.
On the smartphone side, a Bluetooth app needs to be installed and configured to connect to the Micro:bit and send commands to control the robotic arm. The app can be programmed to have buttons or sliders that control the robotic arm’s movements, or to use the phone‘s accelerometer to control the arm’s movements.
Keep in mind that, the complexity of the control may vary depending on the type of robotic arm, the motors and actuators used, and the complexity of the commands that the Micro:bit needs to send, also the quality of the Bluetooth connection can affect the precision and smoothness of the robotic arm’s movements.
In this tutorial, we will control a robotic arm to move an object using the Micro:bit card and a smartphone.
we create two programs: a mobile application with App Inventor for the smartphone and a Makecode program for the Micro: bit card.
Nesseccary components
Micro:bit
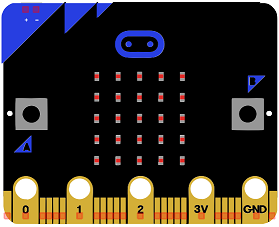
The micro:bit is a small, programmable computer developed by the BBC for use in computer education in the UK. It features a 5×5 LED matrix, two buttons, and various sensors, and can be programmed using a variety of languages, including MakeCode, Python, and JavaScript. The device is intended to be used in classroom settings to teach children the basics of programming and computer science, but it can also be used for a wide variety of other projects and experiments.
Expansion driver card for Micro:bit
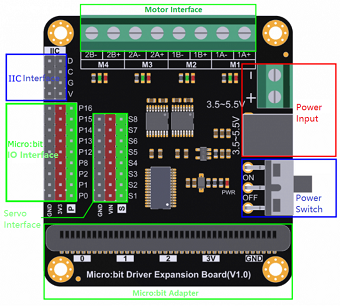
An expansion driver card for the Micro:bit is a type of accessory that allows the Micro:bit to connect to and control various external devices, such as motors, servos, LEDs, sensors, etc. The expansion driver card is usually a small PCB (printed circuit board) that connects to the Micro:bit via the edge connector pins. It provides additional I/O pins, voltage regulators, and other components that are necessary to interface with external devices. The expansion card can also provide additional functionality such as motor controller, ADC, DAC, etc. Many different types of expansion driver cards are available for the Micro:bit, each with different capabilities and features. Some examples include the PXT-Micro:bit, the Micro:bit Motor Driver Board, and the Micro:bit Servo:bit.
Robotic arm kit

A robotic arm kit with servomotors is a type of robotic arm kit that uses servomotors to control the movement of the arm’s joints. Servomotors are small, high-torque motors that can be precisely controlled to rotate to a specific position. This makes them well-suited for use in robotic arms, as they allow for precise and smooth movement of the arm.
Robotic arm kits include all the necessary components to build and control the arm, such as the mechanical parts, servomotors, and a microcontroller or computer board to control the motors. Some kits may also include additional components such as sensors or end effectors (gripper or claw).
These kits can be used for educational, hobbyist, and research purposes. They are easy to assemble and program and can be a great way to learn about robotics, programming, and electronics, as well as to develop problem-solving and critical thinking skills.
Mounting:
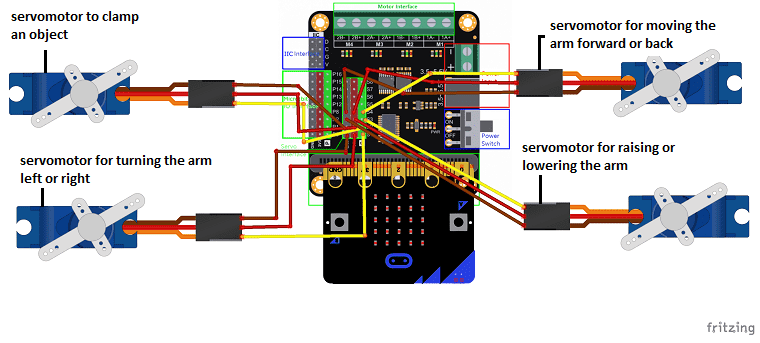
To do the mounting , we connected:
-
the servomotor responsible for orienting the robotic arm down or up to the S1 pin of the driver board.
-
the servomotor responsible for orienting the robotic arm to the left or to the right or to the left at pin S2 of the driver board.
-
the servomotor responsible for opening the gripper of the robotic arm at pin S3 of the driver board.
-
the servomotor responsible for advancing the robotic arm to pin S4 of the driver board.
Makecode program
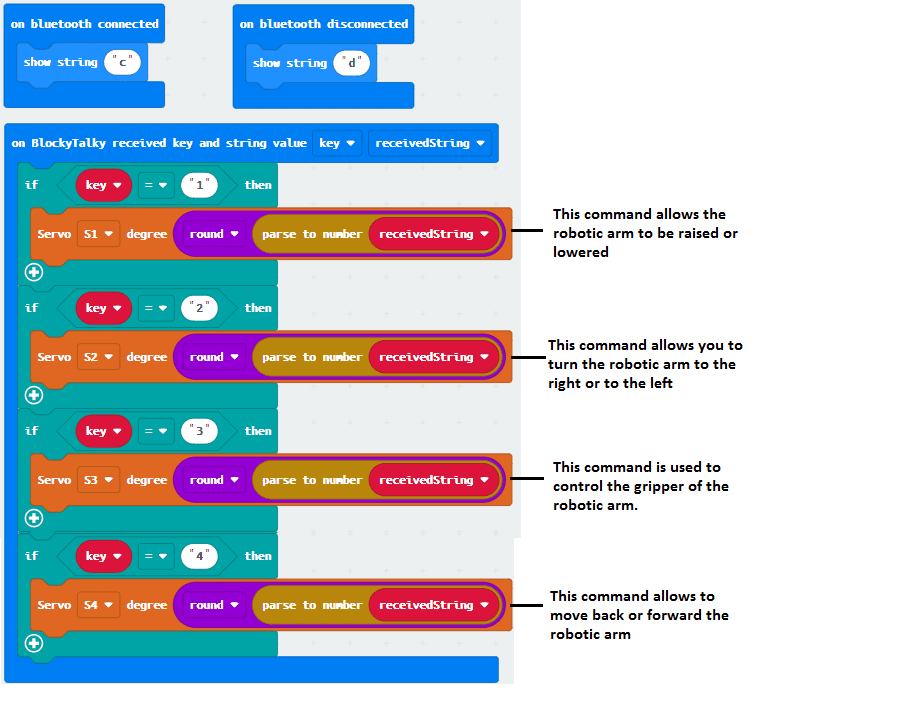
Here is the makecode program which allows you to connect the Micro: bit card to the smartphone and to receive a message containing the command order of the robotic arm.
Creation of the application with App Inventor:
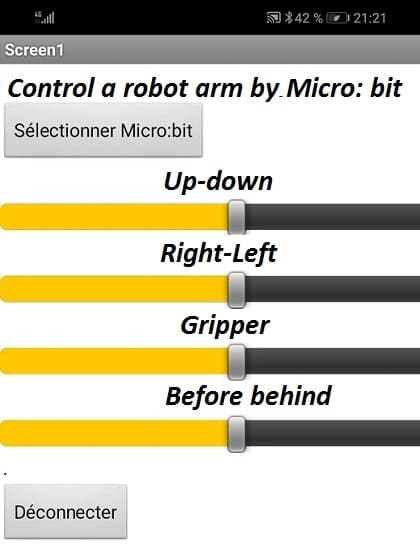
We are going to create a mobile application called ‘microbit_bras’ with App Inventor which makes it possible to control an automatic arm by the smartphone.
We therefore suggest that you create the design of the application, with the following visual:
Programming with App Inventor
To program the application, App Inventor offers us to use the Blocks space, which allows you to create a program in the form of a block diagram. Very easy to use but requiring a little programming logic.
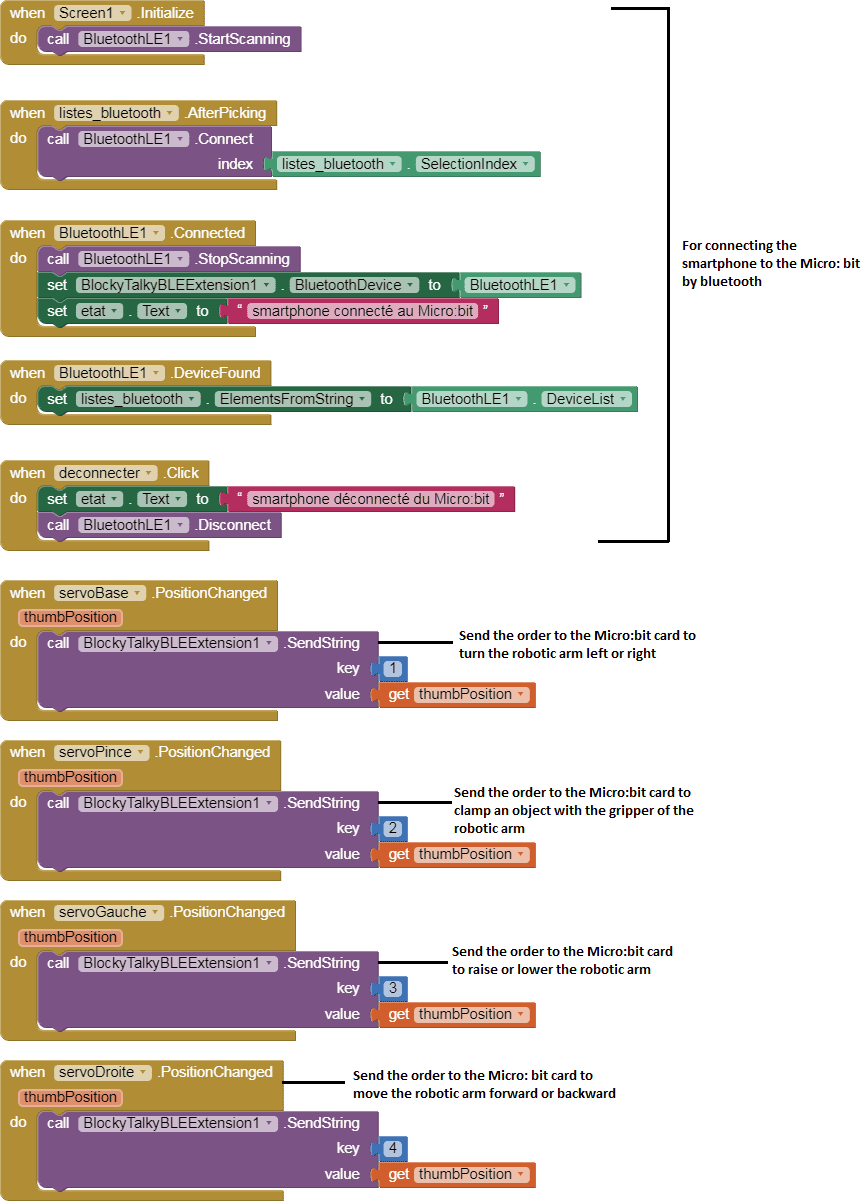
Here is the program of the application created in the Blocks area of the Inventor App:
