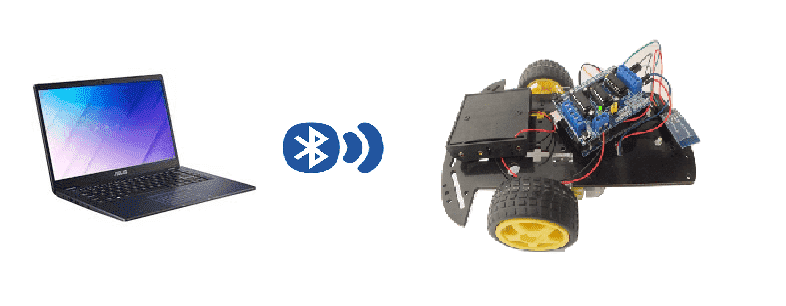
Controlling a car equipped with Arduino by computer via bluetooth

A car robot, also known as an autonomous vehicle, is a vehicle that is capable of sensing its environment and navigating without human input. These types of vehicles use a combination of sensors, such as cameras, lidar, and radar, to gather information about their surroundings and make decisions about how to move. Some examples of car robots include self-driving cars, drones, and delivery robots.
An Arduino-based car robot that uses Bluetooth technology would be a robot vehicle that is controlled by an Arduino microcontroller and uses a Bluetooth module to communicate with a remote device, such as a smartphone or computer. This setup allows the user to remotely control the car robot and receive information from it using a Bluetooth connection. The Arduino would be responsible for interpreting the commands sent via Bluetooth and controlling the movement of the robot. Depending on the complexity of the robot, the Arduino may also be used to process sensor data and make decisions about the robot’s movement. Additionally, the Arduino can be programmed to respond to specific inputs, like joystick or buttons in the phone, to control the car robot.
Objective of this project:
In this project we will make a car equipped with an Arduino board and a bluetooth hc-06 module and controlled by the computer via bluetooth.
The user controls the car using the arrow keys on the keyboard (forward, right, left and back).
Components required
Arduino UNO

The Arduino UNO is a microcontroller board based on the ATmega328 microcontroller. It is one of the most popular boards in the Arduino family and is commonly used in a variety of DIY electronics projects, including robots. The board features 14 digital input/output pins, 6 analog inputs, a 16 MHz quartz crystal, a USB connection, and a power jack. The board can be programmed using the Arduino software development environment (IDE) and can be powered by either USB or an external power supply. It is relatively easy to use for beginners and has a large community and a lot of available libraries and tutorials. It can be used for a wide variety of applications such as controlling motors, reading sensors, and communicating with other devices through various protocols like I2C, SPI or Serial.
HC-06 bluetooth module

The HC-06 Bluetooth module is a popular choice for adding Bluetooth functionality to an Arduino-based car robot. It is a low-cost, low-power, and easy-to-use Bluetooth module that allows an Arduino board to communicate wirelessly with other Bluetooth-enabled devices. The HC-06 can be configured to operate in either slave or master mode. In slave mode, the HC-06 can connect to a master device such as a computer and receive commands to control the robot’s movement. In master mode, the HC-06 can connect to other slave devices such as sensors and receive data. The module can be connected to the Arduino board through the serial communication pins (RX,TX) and with the help of SoftwareSerial library, it can be configured to use other digital pins. The HC-06 is a simple and cost-effective solution for adding wireless communication to an Arduino-based car robot, allowing for remote control and monitoring of the robot’s movement and sensor data.
L298N module
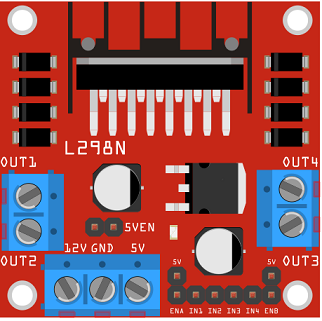
The L298N module is a motor driver module that can be used to control the speed and direction of two DC motors. It is commonly used in robotic car projects because it can handle the high current requirements of motors and has built-in protection against overheating and overcurrent. The module can be controlled using a microcontroller, such as an Arduino, to send PWM signals to control the speed of the motors and digital signals to control the direction of rotation.
5V/3.3V Supply power module
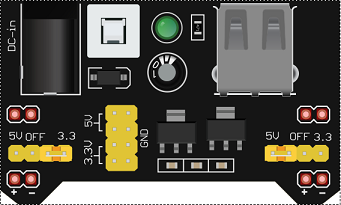
A 5V/3.3V power supply module is a device that can provide regulated power to electronic circuits at both 5V and 3.3V voltage levels. The module typically includes voltage regulators that convert a higher input voltage (such as 7-12V) to a stable and precise output voltage. This type of module is useful in projects where different components require different voltage levels and it eliminates the need for multiple power supply units. The module can be powered using a DC adapter or battery.
2 wheel car robot kit
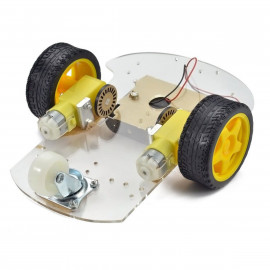
A 2-wheel car robot kit is a collection of components that can be used to build a small, autonomous robot that moves on two wheels. These kits typically include a microcontroller, such as a ESP32 card, to control the robot’s movements, as well as motors, wheels, and other hardware to enable the robot to move and navigate.
2-wheel car robots are often used as educational tools, as they can be used to teach basic principles of robotics, electronics, and programming. They can also be used as a platform for experimenting with different control algorithms, sensors, and other hardware.
This robot kit is composed of:
-
car chassis.
-
2 gear motors (1:48)
-
2 car tires
-
1 universal wheel
connecting wires

Wires are used to transmit electrical signals and power to various components such as motors, sensors, and microcontrollers. It’s important to properly route and secure the wires to prevent tangles and damage. There are several methods for doing this, including using cable ties, clamps, and wire looms. It’s also a good idea to use different colors or labeling to identify the different wires and their functions. When connecting wires in a robot, it’s important to follow proper safety procedures, such as using the correct wire stripper and connectors, and wearing protective equipment such as gloves and safety glasses.
9V battery
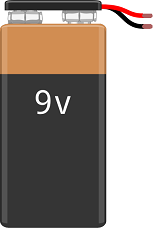
A 9V battery is a type of primary cell, meaning it is not rechargeable and must be replaced after use. It is typically used as a power source for small electronic devices, such as portable radios, smoke detectors, and some types of toys. The « 9V » refers to the nominal voltage of the battery, which is the average voltage it produces when it is fully charged. The actual voltage of a 9V battery can vary depending on the type and state of charge, but it will typically be around 6V-9.5V. Common types of 9V batteries are carbon-zinc, alkaline, and lithium.
Car assembly
-
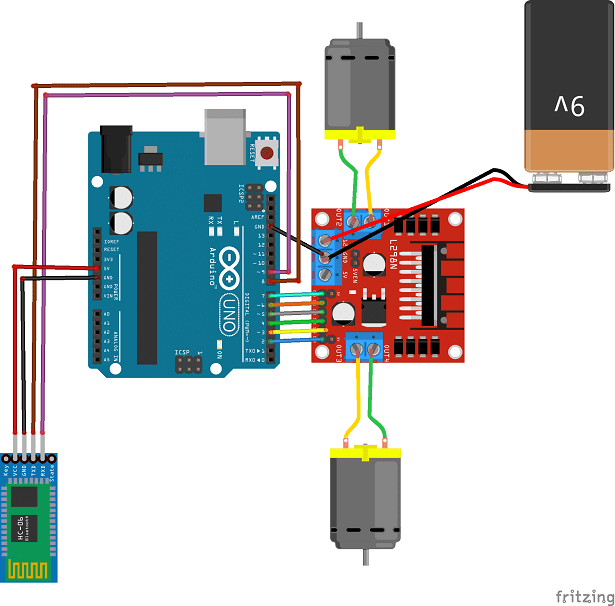
Connect pin 2 of the Arduino board to the INA pin of the L298N module.
-
Connect pin 3 of the Arduino board to pin IN1 of the L298N module.
-
Connect pin 4 of the Arduino board to pin IN2 of the L298N module.
-
Connect pin 5 of the Arduino board to pin IN3 of the L298N module.
-
Connect pin 6 of the Arduino board to pin IN4 of the L298N module.
-
Connect pin 7 of the Arduino board to the INB pin of the L298N module.
-
Connect the GND pin of the Arduino board to the GND pin of the L298N module.
-
Connect the 12V pin of the L298N module to the (+) terminal of the 9V battery
-
Connect the TXD pin of the HC-06 module to pin 8 of the Arduino
-
Connect the RXD pin of the HC-06 module to pin 9 of the Arduino
-
Connect the VCC pin of the HC-06 module to the 5V terminal of the Arduino
-
Connect the GND pin of the HC-06 module to the (-) terminal of the Arduino
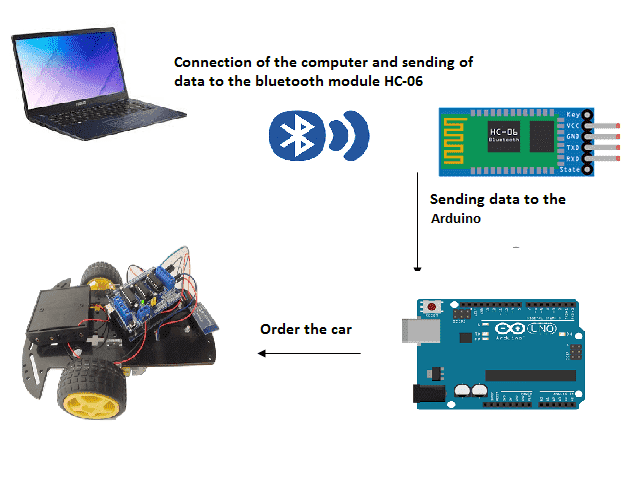
Communication between the computer, HC-06 and the Arduino board:
Arduino program
Here is the program which allows to connect the Arduino board to the HC-06 bluetooth module and to receive a message containing the direction of direction of the car.
|
1 2 3 4 5 6 7 8 9 10 11 12 13 14 15 16 17 18 19 20 21 22 23 24 25 26 27 28 29 30 31 32 33 34 35 36 37 38 39 40 41 42 43 44 45 46 47 48 49 50 51 52 53 54 55 56 57 58 59 60 61 62 63 64 65 66 67 68 69 70 |
// connect motor controller pins to Arduino digital pins // motor one #include <SoftwareSerial.h> SoftwareSerial hc06(8,9); String cmd=""; int enA = 2; int in1 = 3; int in2 = 4; // motor two int enB = 7; int in3 = 5; int in4 = 6; void setup() { //Initialize Serial Monitor Serial.begin(9600); hc06.begin(9600); // set all the motor control pins to outputs pinMode(enA, OUTPUT); pinMode(enB, OUTPUT); pinMode(in1, OUTPUT); pinMode(in2, OUTPUT); pinMode(in3, OUTPUT); pinMode(in4, OUTPUT); analogWrite(enA, 255); analogWrite(enB, 255); } void loop() { while(hc06.available()>0){ cmd+=(char)hc06.read(); } //control speed //Select function with cmd if(cmd!=""){ Serial.print("Command recieved : "); Serial.println(cmd); // We expect ON or OFF from bluetooth if(cmd=="forward"){ digitalWrite(in1, HIGH); digitalWrite(in2, LOW); digitalWrite(in3, HIGH); digitalWrite(in4, LOW);} if(cmd=="backwards"){ digitalWrite(in1, LOW); digitalWrite(in2, HIGH); digitalWrite(in3, LOW); digitalWrite(in4, HIGH);} if(cmd=="right"){ digitalWrite(in1,HIGH ); digitalWrite(in2, LOW); digitalWrite(in3, LOW); digitalWrite(in4, LOW);} if(cmd=="left"){ digitalWrite(in1, LOW); digitalWrite(in2, LOW); digitalWrite(in3, HIGH); digitalWrite(in4, LOW);} if(cmd=="stop"){ digitalWrite(in1, LOW); digitalWrite(in2, LOW); digitalWrite(in3, LOW); digitalWrite(in4, LOW);} cmd=""; //reset cmd } delay(100); } |
Python program executed in the computer:
This is the program that allows the computer to connect and send data to the HC-06 bluetooth module.
|
1 2 3 4 5 6 7 8 9 10 11 12 13 14 15 16 17 18 19 20 21 22 23 24 25 26 27 28 29 30 31 32 33 34 35 36 37 38 39 40 41 42 43 44 |
import serial import time from pynput import keyboard evenement="" print("Start") port="COM20" #This will be different for various devices and on windows it will probably be a COM port. bluetooth=serial.Serial(port, 9600)#Start communications with the bluetooth unit print("Connected") bluetooth.flushInput() #This gives the bluetooth a little kick result = str(0) def on_key_release(key): global result #print('released %s' % key) #result ='released %s' % key+'\n' if result !='stop': #or result == str(2)+'\n' or result == str(3)+'\n' or result == str(4)+'\n': result = 'stop' print(result) result_bytes = result.encode('utf_8') bluetooth.write(result_bytes) def on_key_pressed(key): global result #print('pressed %s' % key) result1 ='%s' % key if result == 'stop': if result1=='Key.up' : result = 'avant' print(result) if result1=='Key.down' : result = 'backwards' print(result) if result1=='Key.left' : result = 'left' print(result) if result1=='Key.right' : result = 'right' print(result) result_bytes = result.encode('utf_8') bluetooth.write(result_bytes) with keyboard.Listener(on_release = on_key_release,on_press=on_key_pressed) as listener: listener.join() |



Divorce Lawyer Brooklyn NY 24-09-2323
It's an amazing piece of writing for all the internet users; they will obtain benefit from it I am sure.
Insulation contractor 26-08-2323
This is really interesting, You are an overly skilled blogger. I've joined your feed and look ahead to in search of extra of your wonderful post. Also, I've shared your web site in my social networks
mortgage lender service 24-08-2323
hello!,I love your writing so a lot! share we keep up a correspondence more about your post on AOL? I require a specialist in this house to solve my problem. Maybe that is you! Having a look forward to peer you.
slip and fall lawyer in Peoria 24-08-2323
This piece of writing is truly a good one it helps new web users, who are wishing for blogging.
walk in clinic near me 19-08-2323
This is a topic that's close to my heart... Many thanks! Exactly where are your contact details though?
affordable removal Manchester 19-08-2323
My relatives every time say that I am killing my time here at web, however I know I am getting know-how daily by reading such nice articles.
Venn 18-08-2323
can i change HC-06 module bluetooth to JDY-31 ?
water heater installation 17-08-2323
You need to be a part of a contest for one of the most useful sites on the internet. I am going to highly recommend this blog!
Andd 02-05-2222
Thanks, very interesting. Is there a way to just use a bluetooth keyboard to control it, without needing the laptop?
Med Ali 02-05-2222
yes you can with smartphone
Feyza 07-04-2222
I have a problem connecting the computer with the Bluetooth module, even if it says connected, there is no movement. How do we choose COM parts, could this be the problem?