Water level measurement system based on Arduino and Smartphone

Water level measurement is the process of determining the level of water in a tank or other container. There are many different ways to measure water level, and the specific method used will depend on the application and the requirements of the system.
Some common methods for measuring water level include:
- Float switches: Float switches use a buoyant object, such as a ball or cylinder, that rises or falls with the water level. As the water level changes, the float switch activates or deactivates a switch or relay, which can be used to trigger an alarm or control a pump or valve.
- Ultrasonic sensors: Ultrasonic sensors use high-frequency sound waves to measure the distance to the surface of the water. By measuring the time it takes for the sound waves to bounce back, the sensor can determine the water level.
- Pressure sensors: Pressure sensors can be used to measure the hydrostatic pressure of the water, which is directly proportional to the water level.
- Conductivity sensors: Conductivity sensors can be used to measure the conductivity of the water, which is affected by the water level. By measuring the conductivity of the water, the sensor can determine the water level.
The specific type of water level measurement system that is best suited for a particular application will depend on factors such as the size of the tank, the accuracy required, and the environmental conditions.
It is possible to build a water level measurement system that uses an Arduino microcontroller and a smartphone. An Arduino is a small, low-cost microcontroller that is widely used for building electronic projects. It is based on the C programming language and has a large and active community of users who share ideas, code, and support for using the platform.
To build a water level measurement system based on the Arduino and a smartphone, you will need to connect a sensor to the Arduino that is capable of measuring the water level. Some options for water level sensors include float switches, ultrasonic sensors, pressure sensors, and conductivity sensors.
Once the sensor is connected, you can use the Arduino to read the sensor data and send it to a smartphone via a wireless connection, such as Bluetooth or Wi-Fi. You can then use an app on the smartphone to display the water level data and potentially control the system, such as by activating a pump or valve based on the water level.
The specific steps for building a water level measurement system based on the Arduino and a smartphone will depend on the specific sensor and components you are using, as well as the code you write in the Arduino development environment.
Purpose of project :
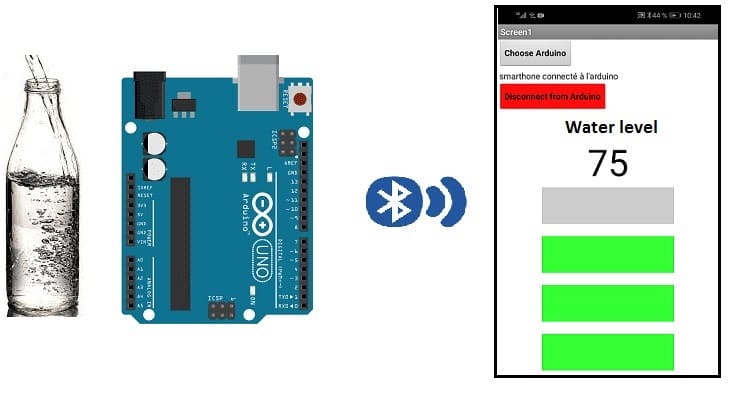
In this project, we will build a smartphone-based bottle water level measurement system using the Arduino board.
Our proposed work will be easy for real-time liquid level measurement using Bluetooth wireless technology.
This is why we will create two programs: a mobile application with App Inventor for the smartphone and a program for the Arduino board.
Description of system operation:
We know that water, like any other liquid, is a conductor of electric current.
The detection of the level of water filled in the bottle is based on this idea.
When the water level rises, this liquid comes into contact with the end of the connection wire fixed in the bottle, the electrical circuit is then closed and a very low voltage electrical current is detected by the Arduino board.
When the water level drops, the electrical circuit is open. As a result, there is no more electric current.
Then the Arduino board sends this information to the Smartphone via Bluetooth.

Components needed:
Arduino UNO

Arduino is an open-source platform that is used for building electronic devices. It consists of hardware (a microcontroller and a set of input/output pins) and software (a development environment). The hardware is designed to be simple and easy to use, while the software provides a wide range of features and libraries to make it easy for users to program the hardware and build complex projects.
Arduino is based on the C programming language, and it is designed to be easy to use even for those who have no programming experience. It is often used for prototyping and for building small, simple projects, such as sensors, robots, and interactive devices. It is also used in a wide range of other applications, including Internet of Things (IoT) devices, home automation systems, and artistic installations.
bluetooth HC-06 Module

The HC-06 Bluetooth module is a small wireless module that allows devices to communicate with each other using Bluetooth technology. It is commonly used in a variety of applications, including home automation, wearable technology, and robotics, where it is used to establish a wireless connection between devices.
Bottle

4 resistors of 10Kohm

A resistor is an electronic component that is used to resist the flow of electrical current. It is made of a material that has a specific resistance value, which determines how much the resistor will resist the flow of current.
Resistors are used in a variety of electronic circuits to control the flow of current and to adjust the voltage levels in a circuit. They are often used in conjunction with other components, such as capacitors and inductors, to create more complex circuits.
connecting wires

Wires are used to transmit electrical signals and power to various components such as motors, sensors, and microcontrollers. It’s important to properly route and secure the wires to prevent tangles and damage. There are several methods for doing this, including using cable ties, clamps, and wire looms. It’s also a good idea to use different colors or labeling to identify the different wires and their functions. When connecting wires in a robot, it’s important to follow proper safety procedures, such as using the correct wire stripper and connectors, and wearing protective equipment such as gloves and safety glasses.
Battery
Mounting
First We drill 5 holes in the bottle. Then we fix a connection wire in each hole.
Then we connect:
-
the lowest jumper wire to the 5V pin of the Arduino
- the 2nd wire connecting to pin A0 of the Arduino
-
connecting the 3rd wire to pin A1 of the Arduino
-
connecting the 4th wire to pin A2 of the Arduino
-
the 5th jumper wire to pin A3 of the Arduino
For the bluetooth module we connect:
-
the VCC pin to the battery (+) terminal
-
the GND pin to the GND pin of the Arduino
-
the TXD pin to pin 2 of the Arduino
-
the RXD pin to pin 3 of the Arduino

Arduino program
Here is the Arduino program that detects the level of water filled in the bottle and sends this information to the Smartphone via Bluetooth.
|
1 2 3 4 5 6 7 8 9 10 11 12 13 14 15 16 17 18 19 20 21 22 23 24 25 26 27 28 29 30 31 32 33 34 35 36 37 38 39 40 41 42 43 44 45 46 47 48 49 50 51 52 53 54 55 56 57 58 59 60 61 62 63 64 65 66 67 68 69 |
#include <SoftwareSerial.h> int analogA0 = A0; int analogA1 = A1; int analogA2 = A2; int analogA3 = A3; int level_1,level_2,level_3,level_4; //analog readings int niveau=60; SoftwareSerial hc06(2,3); int send_0; int send_1; int send_2; int send_3; int send_4; void setup() { send_0=0; send_1=0; send_2=0; send_3=0; send_4=0; Serial.begin(9600); hc06.begin(9600); pinMode(analogA0,INPUT); pinMode(analogA1,INPUT); pinMode(analogA2,INPUT); pinMode(analogA3,INPUT); } void loop() { // Read the analog interface level_1 = analogRead(analogA0); level_2 = analogRead(analogA1); level_3 = analogRead(analogA2); level_4 = analogRead(analogA3); Serial.print("niveau 1 "); Serial.println(level_1); Serial.print("niveau 2 "); Serial.println(level_2); Serial.print("niveau 3 "); Serial.println(level_3); Serial.print("niveau 4 "); Serial.println(level_4); if ((level_1<niveau)&&(level_2<niveau)&&(level_3<niveau)&&(level_4<niveau)&&(send_0==0))// Niveau 0 de l'eau { hc06.print('0'); // send Level 0 to Smartphone send_0=1;send_1=0;send_2=0;send_3=0;send_4=0; } if ((level_1>niveau)&&(level_2<niveau)&&(level_3<niveau)&&(level_4<niveau)&&(send_1==0)) // Niveau 1 de l'eau{ hc06.print("25");// send Level 1 to Smartphone send_0=0;send_1=1;send_2=0;send_3=0;send_4=0; } if ((level_1>niveau)&&(level_2>niveau)&&(level_3<niveau)&&(level_4<niveau)&&(send_2==0)) // Niveau 2 de l'eau{ hc06.print("50");// send Level 2 to Smartphone send_0=0;send_1=0;send_2=1;send_3=0;send_4=0; } if ((level_1>niveau)&&(level_2>niveau)&&(level_3>niveau)&&(level_4<niveau)&&(send_3==0)) // Niveau 3 de l'eau{ hc06.print("75");// send Level 3 to Smartphone send_0=0;send_1=0;send_2=0;send_3=1;send_4=0; } if ((level_1>niveau)&&(level_2>niveau)&&(level_3>niveau)&&(level_4>niveau)&&(send_4==0)) // Niveau 4 de l'eau { hc06.print("100");// send Level 4 to Smartphone send_0=0;send_1=0;send_2=0;send_3=0;send_4=1; } delay(100); } |
Creating the application with App Inventor:
App Inventor is a software application that allows you to create mobile apps for Android devices. It is a visual programming tool that allows you to design the user interface and logic for an app using blocks, similar to Scratch.
Bluetooth is a wireless technology that allows devices to communicate with each other over short distances. It is often used to connect devices such as smartphones, tablets, and laptops to other devices and accessories, such as headphones and speakers.
You can use App Inventor to create an Android app that can communicate with an Arduino microcontroller over Bluetooth. To do this, you will need to use a Bluetooth component in your App Inventor app and a Bluetooth module connected to your Arduino board. You can then send commands and data between the app and the Arduino board using Bluetooth.
We will create a mobile application named ‘arduino_water_level’ with App Inventor which allows to receive the water level in the bottle measured by the Arduino board.
We therefore suggest that you create the design of the application, with the following visual:

Programming with App Inventor
To program the application, App Inventor offers us to use the Blocks space which allows you to create a program in the form of a block diagram. Very easy to use but requires some programming logic.
Here is the program of the application made in the Blocks space of the App Inventor:


