
Weighing scale using HX711 and ESP32 for remote weight monitoring (by bluetooth)

A weighing scale is a device that is used to measure the weight of an object or a group of objects. There are many different types of weighing scales, including mechanical scales, electronic scales, and digital scales.
Mechanical scales use a spring or balance beam to measure weight. They are typically less accurate than electronic or digital scales, and are often used for rough estimates of weight.
Electronic scales use a load cell to convert weight into an electrical signal. They are typically more accurate than mechanical scales, and can be used to measure weight with greater precision.
Digital scales use a load cell to convert weight into an electrical signal, which is then displayed digitally. They are typically the most accurate type of scale and can display weight in a variety of units.
An ESP32 microcontroller can be used to build a weighing scale by interfacing with a load cell sensor and using its built-in analog-to-digital converter (ADC) to convert the sensor’s output into a weight measurement. The ESP32 also has built-in WiFi and Bluetooth capabilities, which can be used to wirelessly transmit weight measurements to other devices such as a smartphone or computer.
To build a weighing scale with ESP32, the load cell sensor should be connected to an amplifier circuit, such as the HX711, which amplifies the small electrical signals produced by the sensor and sends them to the ESP32. The ESP32 can then read the amplified signals using its ADC and convert them into weight measurements.
The ESP32 can also be used to create a web server or a mobile application, to display the weight measurements and to store the data. The weight measurement can be sent over WiFi or Bluetooth to other devices, where the data can be read and displayed in real-time.
It’s important to note that building a weigh scale with ESP32 requires a good understanding of programming with the ESP32 and also experience with load cells and the HX711. Also, as with any other weigh scale, it’s important to calibrate the load cells before start working with it.
Purpose of project:
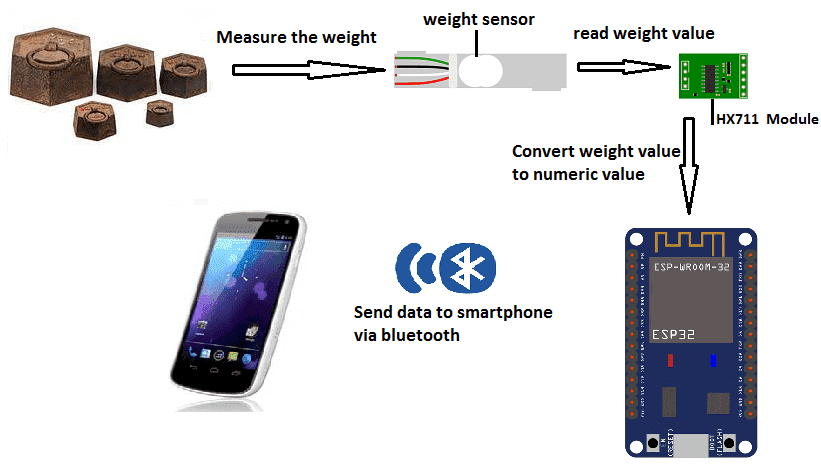
In this project, we will build a weighing scale equipped with the ESP32 card, the HX711 module and weight sensor for remote weight monitoring by a smartphone via bluetooth.
This is why we will create two programs: a mobile application with App Inventor for the smartphone and micropython programs for the ESP32 card.
Necessary components
ESP32 card
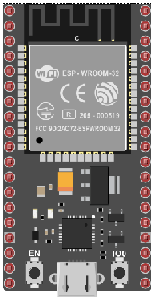
An ESP32 card is a small form factor version of the ESP32 microcontroller board that is designed to be easily integrated into other devices and systems. ESP32 card is a compact version of the ESP32 microcontroller board which can be easily integrated into other devices and systems. It typically includes the ESP32 microcontroller, power management components, and a variety of interfaces such as USB, UART, and SPI.
The ESP32 card can be used in a wide range of applications, such as IoT devices, home automation systems, and industrial control systems. The ESP32 card offers a variety of features that make it a suitable choice for these types of applications, including its low power consumption, high processing power, and built-in WiFi and Bluetooth capabilities.
HX711 module

The HX711 is an integrated circuit that is commonly used to interface with load cells, which are sensors used to measure weight. The HX711 is a 24-bit analog-to-digital converter (ADC) designed specifically for weigh scales and other industrial control applications. It has two input channels for differential measurements and can convert the analog signals from the load cells into a digital representation of the weight being measured.
The HX711 can be easily interfaced with a microcontroller such as the ESP32 through its digital interface. The HX711 has three pins: VCC, GND, and DT. The VCC and GND pins are used to power the chip and the DT pin is used to send and receive data to and from the ESP32. The HX711 communicates with the ESP32 using a serial protocol, so it can be easily integrated with any load cell.
The HX711 is a very popular choice for load cell amplifiers because it is inexpensive, easy to use, and has a high resolution and accuracy. It also has a low noise level, making it ideal for use in low-light environments. It’s important to note that the HX711 requires a library to be integrated with the ESP32 and also it’s important to calibrate the load cell before start working with it.
weight sensor
![]()
A weight sensor, also known as a load cell, is a type of transducer that converts a force, such as weight, into an electrical signal. Load cells are commonly used in industrial and commercial applications to measure the weight of objects, such as in scales and weighing systems. There are several types of load cells available, each with their own unique characteristics and advantages.
Connecting wires

Wires in a robotic system are used to connect and transmit electrical signals between different components of the robot. These components can include sensors, actuators, motors, and the microcontroller, such as an Arduino. The wires in a robotic system are typically made of copper and are insulated to prevent electrical interference and short circuits.
The type of wires used in a robotic system depends on the specific application and requirements of the robot. For example, a robot that requires high-current power transmission may use thicker, high-gauge wires, while a robot that requires a high degree of flexibility and movement may use thinner, more flexible wires.
Test plate
A test plate is a type of device that is used to test the functionality of other devices or systems. It can be used to test a variety of different components such as sensors, actuators, and electronic circuits. The design and construction of a test plate will depend on the specific components or systems being tested.
Mounting
-
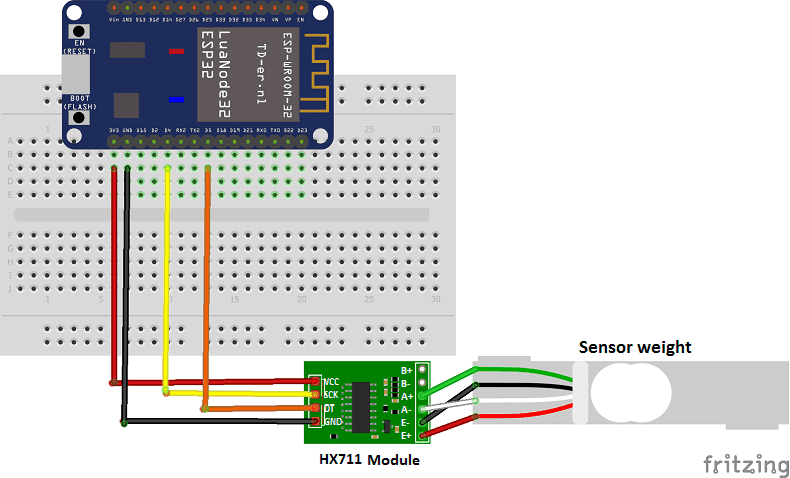
We connect the VCC pin of the hx711 module to the 3.3V pin of ESP32
-
We connect the GND pin of the hx711 module to the GND pin of ESP32
-
We connect the DT pin of the hx711 module to the D5 pin of ESP32
-
We connect the SCK pin of the hx711 module to the D4 pin of ESP32
-
We connect the E+ pin of the hx711 module to the red wire of the weight sensor
-
We connect the E- pin of the hx711 module to the black wire of the weight sensor
-
We connect pin A- of the hx711 module to the white wire of the weight sensor
-
We connect the A+ pin of the hx711 module to the green wire of the weight sensor
Scale operation
Micropython program
Here are the micropython programs needed to connect the ESP32 board to the smartphone and send the value of the weight measured by the HX711 module to the smartphone.
boot.py
|
1 2 3 4 5 6 7 8 9 10 11 12 13 14 15 16 17 18 19 20 21 22 23 24 25 26 27 28 29 30 31 32 33 34 35 36 |
from esp_ble_uart import * import time from machine import freq #freq(160000000) from hx711 import HX711 driver = HX711(d_out=5, pd_sck=4) nom = 'ESP32-ble-uart-gcworks' UUID_UART = '6E400001-B5A3-F393-E0A9-E50E24DCCA9E' UUID_TX = '6E400003-B5A3-F393-E0A9-E50E24DCCA9E' UUID_RX = '6E400002-B5A3-F393-E0A9-E50E24DCCA9E' val_rx = "12" uart = Bleuart(nom, UUID_UART, UUID_TX, UUID_RX) uart.close() def rcp_rx(): global val_rx if uart.any(): while uart.any(): val_rx = uart.read().decode().strip() print('sur rx: ', val_rx) def env_tx(val_tx): uart.write(str(val_tx) + '\n') print("tx", val_tx) while True: uart.irq(handler=rcp_rx) print((driver.read()-183200)/238) env_tx(round(((driver.read()-183200)/238)+15)) # the mesured weight sent to smartphone time.sleep_ms(1000) driver.power_off() |
esp_ble_uart.py
|
1 2 3 4 5 6 7 8 9 10 11 12 13 14 15 16 17 18 19 20 21 22 23 24 25 26 27 28 29 30 31 32 33 34 35 36 37 38 39 40 41 42 43 44 45 46 47 48 49 50 51 52 53 54 55 56 57 58 59 60 61 62 63 64 65 66 67 68 69 70 71 72 73 74 75 76 77 78 79 80 81 82 83 84 85 86 87 88 89 90 91 92 93 94 95 96 97 98 99 100 101 102 103 104 105 106 107 108 109 110 111 112 113 114 115 116 117 118 119 120 121 122 123 124 125 126 127 128 129 130 131 132 133 134 135 136 137 138 139 140 |
from micropython import const import struct import bluetooth # Advertising payloads are repeated packets of the following form: # 1 byte data length (N + 1) # 1 byte type (see constants below) # N bytes type-specific data _ADV_TYPE_FLAGS = const(0x01) _ADV_TYPE_NAME = const(0x09) _ADV_TYPE_UUID16_COMPLETE = const(0x3) _ADV_TYPE_UUID32_COMPLETE = const(0x5) _ADV_TYPE_UUID128_COMPLETE = const(0x7) _ADV_TYPE_UUID16_MORE = const(0x2) _ADV_TYPE_UUID32_MORE = const(0x4) _ADV_TYPE_UUID128_MORE = const(0x6) _ADV_TYPE_APPEARANCE = const(0x19) _IRQ_CENTRAL_CONNECT = const(1 << 0) _IRQ_CENTRAL_DISCONNECT = const(1 << 1) _IRQ_GATTS_WRITE = const(1 << 2) # org.bluetooth.characteristic.gap.appearance.xml _ADV_APPEARANCE_GENERIC_COMPUTER = const(128) # Generate a payload to be passed to gap_advertise(adv_data=...). def advertising_payload(limited_disc=False, br_edr=False, name=None, services=None, appearance=0): payload = bytearray() def _append(adv_type, value): nonlocal payload payload += struct.pack('BB', len(value) + 1, adv_type) + value _append(_ADV_TYPE_FLAGS, struct.pack('B', (0x01 if limited_disc else 0x02) + (0x00 if br_edr else 0x04))) if name: _append(_ADV_TYPE_NAME, name) if services: for uuid in services: b = bytes(uuid) if len(b) == 2: _append(_ADV_TYPE_UUID16_COMPLETE, b) elif len(b) == 4: _append(_ADV_TYPE_UUID32_COMPLETE, b) elif len(b) == 16: _append(_ADV_TYPE_UUID128_COMPLETE, b) # See org.bluetooth.characteristic.gap.appearance.xml _append(_ADV_TYPE_APPEARANCE, struct.pack('<h', appearance)) return payload def decode_field(payload, adv_type): i = 0 result = [] while i + 1 < len(payload): if payload[i + 1] == adv_type: result.append(payload[i + 2:i + payload[i] + 1]) i += 1 + payload[i] return result def decode_name(payload): n = decode_field(payload, _ADV_TYPE_NAME) return str(n[0], 'utf-8') if n else '' def decode_services(payload): services = [] for u in decode_field(payload, _ADV_TYPE_UUID16_COMPLETE): services.append(bluetooth.UUID(struct.unpack('<h', u)[0])) for u in decode_field(payload, _ADV_TYPE_UUID32_COMPLETE): services.append(bluetooth.UUID(struct.unpack('<d', u)[0])) for u in decode_field(payload, _ADV_TYPE_UUID128_COMPLETE): services.append(bluetooth.UUID(u)) return services class Bleuart: def __init__(self, name, UUID_UART, UUID_TX, UUID_RX, rxbuf=100): _UART_UUID = bluetooth.UUID(UUID_UART,) _UART_TX = (bluetooth.UUID(UUID_TX), bluetooth.FLAG_NOTIFY,) _UART_RX = (bluetooth.UUID(UUID_RX), bluetooth.FLAG_WRITE,) _UART_SERVICE = (_UART_UUID, (_UART_TX, _UART_RX,),) self._ble = bluetooth.BLE() self._ble.active(True) self._ble.irq(handler=self._irq) ((self._tx_handle, self._rx_handle,),) = self._ble.gatts_register_services((_UART_SERVICE,)) # Increase the size of the rx buffer and enable append mode. self._ble.gatts_set_buffer(self._rx_handle, rxbuf, True) self._connections = set() self._rx_buffer = bytearray() self._handler = None # Optionally add services=[_UART_UUID], but this is likely to make the payload too large. self._payload = advertising_payload(name=name, appearance=_ADV_APPEARANCE_GENERIC_COMPUTER) self._advertise() def irq(self, handler): self._handler = handler def _irq(self, event, data): # Track connections so we can send notifications. if event == _IRQ_CENTRAL_CONNECT: conn_handle, _, _, = data self._connections.add(conn_handle) elif event == _IRQ_CENTRAL_DISCONNECT: conn_handle, _, _, = data if conn_handle in self._connections: self._connections.remove(conn_handle) # Start advertising again to allow a new connection. self._advertise() elif event == _IRQ_GATTS_WRITE: conn_handle, value_handle, = data if conn_handle in self._connections and value_handle == self._rx_handle: self._rx_buffer += self._ble.gatts_read(self._rx_handle) if self._handler: self._handler() def any(self): return len(self._rx_buffer) def read(self, sz=None): if not sz: sz = len(self._rx_buffer) result = self._rx_buffer[0:sz] self._rx_buffer = self._rx_buffer[sz:] return result def write(self, data): for conn_handle in self._connections: self._ble.gatts_notify(conn_handle, self._tx_handle, data) def close(self): for conn_handle in self._connections: self._ble.gap_disconnect(conn_handle) self._connections.clear() def _advertise(self, interval_us=500000): self._ble.gap_advertise(interval_us, adv_data=self._payload) |
hx711.py
|
1 2 3 4 5 6 7 8 9 10 11 12 13 14 15 16 17 18 19 20 21 22 23 24 25 26 27 28 29 30 31 32 33 34 35 36 37 38 39 40 41 42 43 44 45 46 47 48 49 50 51 52 53 54 55 56 57 58 59 60 61 62 63 64 65 66 67 68 69 70 71 72 73 74 75 76 77 78 79 80 81 82 83 84 85 86 87 88 89 90 91 92 93 94 95 96 97 98 99 100 101 102 103 104 105 106 107 108 109 110 111 112 113 114 115 116 117 118 119 120 121 122 123 124 125 126 127 128 129 130 131 132 133 134 135 136 137 138 139 140 141 142 143 144 145 146 |
from utime import sleep_us, time from machine import Pin from micropython import const class HX711Exception(Exception): pass class InvalidMode(HX711Exception): pass class DeviceIsNotReady(HX711Exception): pass class HX711(object): """ Micropython driver for Avia Semiconductor's HX711 24-Bit Analog-to-Digital Converter """ CHANNEL_A_128 = const(1) CHANNEL_A_64 = const(3) CHANNEL_B_32 = const(2) DATA_BITS = const(24) MAX_VALUE = const(0x7fffff) MIN_VALUE = const(0x800000) READY_TIMEOUT_SEC = const(5) SLEEP_DELAY_USEC = const(80) def __init__(self, d_out: int, pd_sck: int, channel: int = CHANNEL_A_128): self.d_out_pin = Pin(d_out, Pin.IN) self.pd_sck_pin = Pin(pd_sck, Pin.OUT, value=0) self.channel = channel def __repr__(self): return "HX711 on channel %s, gain=%s" % self.channel def _convert_from_twos_complement(self, value: int) -> int: """ Converts a given integer from the two's complement format. """ if value & (1 << (self.DATA_BITS - 1)): value -= 1 << self.DATA_BITS return value def _set_channel(self): """ Input and gain selection is controlled by the number of the input PD_SCK pulses 3 pulses for Channel A with gain 64 2 pulses for Channel B with gain 32 1 pulse for Channel A with gain 128 """ for i in range(self._channel): self.pd_sck_pin.value(1) self.pd_sck_pin.value(0) def _wait(self): """ If the HX711 is not ready within READY_TIMEOUT_SEC the DeviceIsNotReady exception will be thrown. """ t0 = time() while not self.is_ready(): if time() - t0 > self.READY_TIMEOUT_SEC: raise DeviceIsNotReady() @property def channel(self) -> tuple: """ Get current input channel in a form of a tuple (Channel, Gain) """ if self._channel == self.CHANNEL_A_128: return 'A', 128 if self._channel == self.CHANNEL_A_64: return 'A', 64 if self._channel == self.CHANNEL_B_32: return 'B', 32 @channel.setter def channel(self, value): """ Set input channel HX711.CHANNEL_A_128 - Channel A with gain 128 HX711.CHANNEL_A_64 - Channel A with gain 64 HX711.CHANNEL_B_32 - Channel B with gain 32 """ if value not in (self.CHANNEL_A_128, self.CHANNEL_A_64, self.CHANNEL_B_32): raise InvalidMode('Gain should be one of HX711.CHANNEL_A_128, HX711.CHANNEL_A_64, HX711.CHANNEL_B_32') else: self._channel = value if not self.is_ready(): self._wait() for i in range(self.DATA_BITS): self.pd_sck_pin.value(1) self.pd_sck_pin.value(0) self._set_channel() def is_ready(self) -> bool: """ When output data is not ready for retrieval, digital output pin DOUT is high. """ return self.d_out_pin.value() == 0 def power_off(self): """ When PD_SCK pin changes from low to high and stays at high for longer than 60 us , HX711 enters power down mode. """ self.pd_sck_pin.value(0) self.pd_sck_pin.value(1) sleep_us(self.SLEEP_DELAY_USEC) def power_on(self): """ When PD_SCK returns to low, HX711 will reset and enter normal operation mode. """ self.pd_sck_pin.value(0) self.channel = self._channel def read(self, raw=False): """ Read current value for current channel with current gain. if raw is True, the HX711 output will not be converted from two's complement format. """ if not self.is_ready(): self._wait() raw_data = 0 for i in range(self.DATA_BITS): self.pd_sck_pin.value(1) self.pd_sck_pin.value(0) raw_data = raw_data << 1 | self.d_out_pin.value() self._set_channel() if raw: return raw_data else: return self._convert_from_twos_complement(raw_data) |
Creating the application with App Inventor:
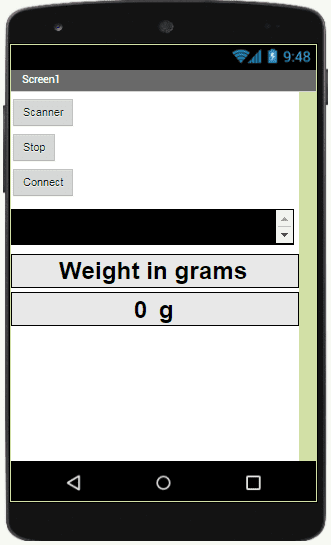
We will create a mobile application named ‘ESP32Poids’ with App Inventor which allows you to receive the weight measured by the ESP32 card.
We therefore suggest that you create the design of the application, with the following visual:
Programmation avec App Inventor
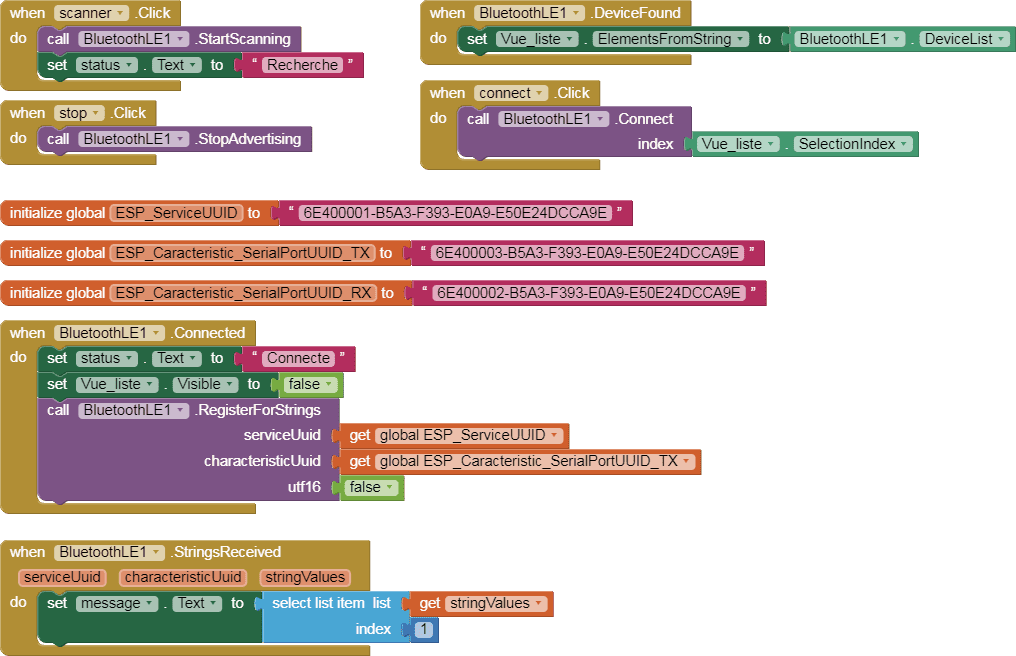
Pour programmer l’application, App Inventor nous propose d’utiliser L’espace Blocs qui permet de créer un programme sous forme de schéma bloc. Très simple d’utilisation mais nécessitant un peu de logique de programmation.
Voici le programme de l’application réalisée dans l’espace Blocs de l’App Inventor:



saบาคาร่า 12-12-2323
Thanks for the marvelous posting! I truly enjoyed reading it, you will be a great author.I will ensure that I bookmark your blog and will eventually come back very soon. I want to encourage one to continue your great posts, have a nice weekend!